

MicrosoftオフィスのメーラーであるOutlook
この Outlookでフォント(書式)を変更するショートカットを作成して時短する方法 を紹介します。
そもそもメールに着色や太字は要るのか?伝わったらいいじゃないか!
というお声もありそうですが、やはり強調したい部分を装飾した方が伝わる気がします。
で、そこに時間をかけてたら元も子もないので、おりんパパ大好きな左手ショートカットを使って瞬時にフォントを変更する方法を紹介します。
この記事で紹介する技術
- OutlookのVBAマクロの紹介
- 左手ショートカットで片手で瞬時にフォントを変更する方法
この記事の参考になる方(Outlookユーザーが前提)
- 瞬時にフォントを変更したいと思っている方
- OutlookのVBAに触れてみたい方
さっそくいきましょう。
瞬時にフォントを変更するショートカット作成方法
先に言っておくと、この記事とやることは同じです。
こちらも便利ですので参考にしてください!
 片手で食事をとりながらメールを見る:Outlook(365)で既読→次のメールへ移動するショートカット
 マクロを登録するための作業です
VBA起動のお決まり:Alt+F11 でVBAを起動
標準モジュールを挿入
※別のマクロを作成済の方は続きに書いても良いし、Module2を作ってもOKです。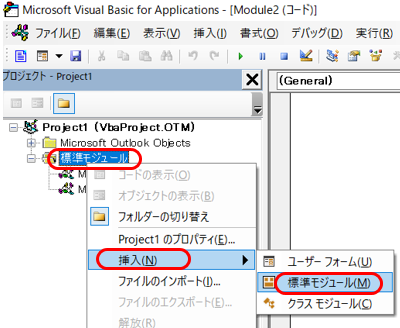
下のコードを貼り付ける
Sub Bold_Blue() Dim FontEditor As Object Set FontEditor = ActiveInspector.WordEditor With FontEditor.Application.Selection ' .Font.Name = "MS UI Gothic" .Font.Bold = True .Font.ColorIndex = 2 'Blue .Font.Size = 10 End With
End Sub
Sub Bold_Pink() Dim FontEditor As Object Set FontEditor = ActiveInspector.WordEditor With FontEditor.Application.Selection ' .Font.Name = "MS UI Gothic" .Font.Bold = True .Font.ColorIndex = 5 'Pink .Font.Size = 10 End With
End Sub
Sub Bold_Red() Dim FontEditor As Object Set FontEditor = ActiveInspector.WordEditor With FontEditor.Application.Selection ' .Font.Name = "MS UI Gothic" .Font.Bold = True .Font.ColorIndex = 6 'Red .Font.Size = 10 End With
End Sub
Sub UnBold() Dim FontEditor As Object Set FontEditor = ActiveInspector.WordEditor With FontEditor.Application.Selection .Font.Name = "MS UI Gothic" .Font.Bold = False .Font.ColorIndex = 1 ' wdBlack .Font.Size = 10 End With
End Sub保存してVBAを閉じる
※自動でアドイン申請されるので、これでマクロを使う準備ができました
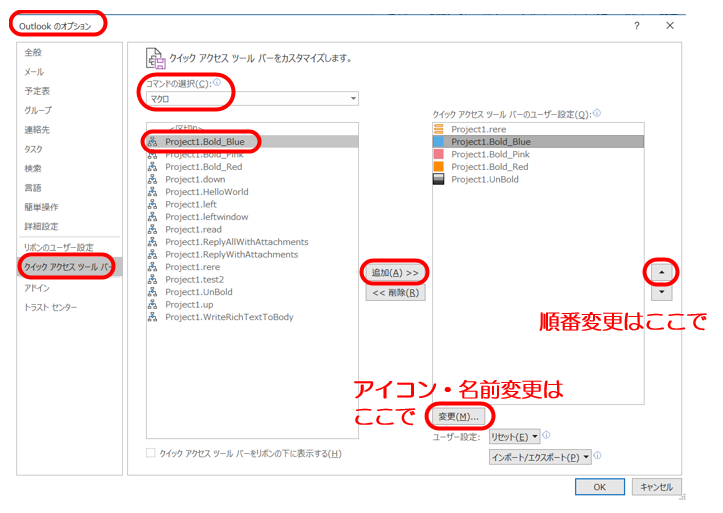
クイックアクセスツールバーにマクロを登録します
①ファイル – オプション – クイックアクセスツールバーを選択
②コマンドの種類を『マクロ』にする。
③登録したいマクロを『追加』する。
④アイコン・名前・順番は変えれるので、自由に設定してください。
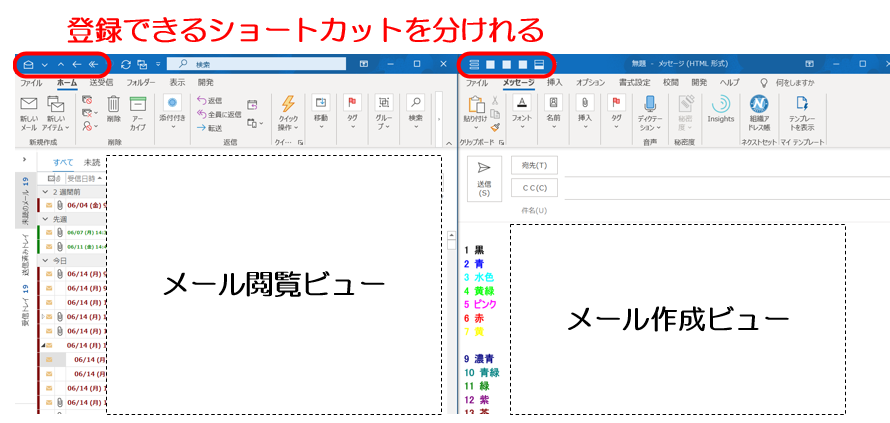
メール作成ビューで、Altキー+1,2,3,・・・と登録したマクロを使用します
下の記事では、メール閲覧ビューに対するショートカットを設定しました。
片手で食事をとりながらメールを見る:Outlook(365)で既読→次のメールへ移動するショートカット 「これで左手埋まってるやん」
と思われますが、メール作成ビューはまた別で設定ができちゃいます!!
下がビューによる設定の違いです。
VBAコードの解説/フォントの変更
今回のVBAコードの解説です。
Sub Bold_Blue() Dim FontEditor As Object Set FontEditor = ActiveInspector.WordEditor With FontEditor.Application.Selection ' .Font.Name = "MS UI Gothic" .Font.Bold = True .Font.ColorIndex = 2 'Blue .Font.Size = 10 End With
End Sub- Dim FontEditor As Object
⇒ FontEditorという変数(入れ物)を設定 - Set FontEditor = ActiveInspector.WordEditor
⇒ FontEditorはWordEditorを用いて編集すると宣言 - With ~ End Withは、繰り返す部分(ここではFontEditor.Application.Selection)の省略です。
.Font.Name = “MS UI Gothic” ⇒フォントの指定です。
.Font.Bold = True ⇒太字の設定です。Trueが太字。Falseが細字
.Font.ColorIndex = 2 ‘Blue ⇒色設定です。詳細はこちらを参照下さい。
.Font.Size = 10 ⇒字の大きさです。
カスタマイズするならこれくらいかな?と思うので、これをおさえておけばOKと思います。
Outlookはなかなかに複雑なので、一旦WordEditorという機能を挟んで編集するのがポイントです。
[ad05]
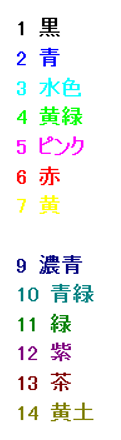
色設定
WordEditorには独自の色設定があります。
こちらの一覧から好きな色番号を選んで、VBAの『.Font.ColorIndex = 2』の部分の数字を変更して下さい。
1 :黒
2 :青
3 :水色
4 :黄緑
5 :ピンク
6 :赤
7 :黄
8 :白
9 :濃青
10 :青緑
11 :緑
12 :紫
13 :濃赤
14 :濃黄
[ad06]
実際の色はこんな感じになります。
その他の書式設定紹介
追加で設定を紹介するのは下記です。
- イタリック体(斜字)
- アンダーライン(下線)
- 取り消し線
- マーカー
それらを含めたコードはこちらになります。
Sub Bold_Blue() Dim FontEditor As Object  Set FontEditor = ActiveInspector.WordEditor With FontEditor.Application.Selection ' .Font.Name = "MS UI Gothic" .Font.Bold = True .Font.Italic = True .Font.ColorIndex = 6 ' Red .Font.Underline = True .Font.Strikethrough = True .Range.HighlightColorIndex = 7 'yellow .Font.Size = 10 End With
End Sub
[ad06]
解説① フォント以外の文
- Dim FontEditor As Object
⇒ FontEditorという変数(入れ物)を設定 - Set FontEditor = ActiveInspector.WordEditor
⇒ FontEditorはWordEditorを用いて編集すると宣言 - With ~ End Withは、繰り返す部分(ここではFontEditor.Application.Selection)の省略です。
解説② フォント部分
<太字のみ>
.Font.Bold = True
※細字は .Font.Bold = False
<斜字追加>
.Font.Bold = True
.Font.Italic = True
※斜字無しは .Font.Italic = False

<字の色変更>
.Font.Bold = True
.Font.Italic = True
.Font.ColorIndex = 6 ‘ Red
※カラーインデックスはこちら

<アンダーライン追加>
.Font.Bold = True
.Font.Italic = True
.Font.ColorIndex = 6 ‘ Red
.Font.Underline = True
※下線無し指定は .Font.Underline = False

<取り消し線(1重)>
※アンダーラインと合わせて2重取り消し線
.Font.Bold = True
.Font.Italic = True
.Font.ColorIndex = 6 ‘ Red
.Font.Underline = True
.Font.Strikethrough = True
※取り消し無し指定は .Font.Strikethorough = False

<マーカー追加>
.Font.Bold = True
.Font.Italic = True
.Font.ColorIndex = 6 ‘ Red
.Font.Underline = True
.Font.Strikethrough = True
.Range.HighlightColorIndex = 7 ‘yellow
※カラーインデックスはこちら

<字のサイズ変更>
.Font.Bold = True
.Font.Italic = True
.Font.ColorIndex = 6 ‘ Red
.Font.Underline = True
.Font.Strikethrough = True
.Range.HighlightColorIndex = 7 ‘yellow
.Font.Size = 15

最後まで見て頂きありがとうございました!
広告
広告
広告